Behind The Technology
As some people will be aware, Peter Salmon Director of BBC North, opened our HD (High Definition) Studio in December 2010. My update then was to explain why the studio was designed in this particular way, the student experience and what this brings to Edge Hill University. The next scene is what lives “Behind the Technology” and what technical equipment makes a good digital HD studio.
Studios are made up from key components. It’s how these components interface with each other that makes a good studio. A streamlined workflow model, ease of use, ensuring equipment failure does not have a major impact (so called design redundancy) are all key factors in an efficient and resilient TV studio.
Cameras
To begin with, we need cameras to capture the scene. We have three HD cameras, full HD 1080 x 1920. But what does this mean and why is it important? To explain this we need to look at the way images are transmitted to our televisions.
The transmission medium in this country is 625 PAL standard definition for terrestrial TV. This is TV through your aerial. This means that the picture in your TV is made up from 625 lines, from the top of your screen to the bottom – although you only see 576 lines, the other lines are used to carry timing signals and are blanked from the viewer – and 720 pixels across from the left of your screen to the right. Pixels could be described as a row of very small squares across the screen. The more pixels you have the sharper the image, it’s just like looking at pictures in the news paper only they refer to them as DPI (Dot Per Inch). So effectively, for non-HD TVs, we have 720 pixels across by 576 lines down so 720×576 = 414720 total pixels. Therefore the screen ratio (the ratio of the width to it’s height) is 4×3.
In HD TVs we have 1920 pixels across by 1080 lines down so 1920×1080 = 2073600 pixels. This also gives us the wide screen aspect ratio of 16×9. That’s roughly 5 times the pixels and 4 times the resolution!
Camera Channels
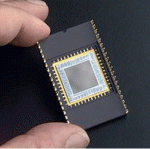
A camera channel consists of a camera lens, camera body, camera adaptor, base station, OCP (Operational Control Panel) and MCP (Master Control Panel). Camera lens is self-explanatory; this is used for focusing and zooming into the subject and allowing the correct amount of light to fall on the CCD (Charge Coupled Device) imaging sensors within the front end of the camera. Each of our cameras has 3 of these.

The camera body houses the main electronics that process the video signal. As light enters though the lens it gets spilt by a diachronic prism, which produces red, green and blue (RGB) light and directs it onto the individual CCD sensors for processing.
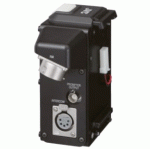
The camera adaptor is the rear end of the camera. You can get different camera adaptors to suit the purpose of use. In a studio environment you can have a muilticore adaptor, triax adaptor and fibre adaptor.
Too many choices, so why do we need different adaptors and what are they used for?
The camera adaptor is used to connect the camera to the base station. The base station is what provides power to the camera as well as video signals, communications (instructions to the camera person, electronic signals/instructions to the camera parts), cues and electronic instructions. The red light on the camera, called a cue light, indicates when you are on air. There’s lots more going on but this sums up the basics.
Multicore means the camera is connected to the base station via a 26 core cable. So you can imagine the weight of the cable, all the little pins in the plugs and sockets that are used to connect the devices together. There can be no margins for error. These are designed to a military specification to take the punishment of constantly being connected and disconnected sometimes in poor environmental surroundings, as you see for example on location shooting. This is not a problem in a studio environment which is carefully controlled.

Triax means the camera is connected to the base station via a cable similar to a coax cable you would find on an aerial, only a little bigger in diameter. The signals are carried down the centre core and the outer core shields the cable from interference. These are used to connect the cameras to the base stations over longer distances. There is also less chance of cable failure due to their construction.
These cables and camera adaptors are more expensive, but allow the signals to travel over long distances, as in an OB (Outside Broadcast unit) they may be at a football ground and the CCU (Camera Control Unit) that sits in the studio could be 100 metres away. Fibre connection means the camera is connected to the base station via an optical cable, these are more expensive and can travel even greater distances than triax.
This just gives you a basic background to studio cameras and is only one piece of equipment in the studio jigsaw. For more information on our studio facilities please ring 01695 584304 or e-mail [email protected] . The media development team can also provide one to one sessions on request and a full overview of our latest, up to date technology. If you have any questions or feedback on our studio facilities please leave your comments below or by using the contact details provided.


2 responses to “Lights Camera Action “Take 2 on the Clock”.”
It’s really interesting to read about the technology that is used to make a broadcast possible and the state-of the-art equipment that is available in the University’s TV studio. Look forward to the “behind the scenes” tour on the 26th!
I attended a session in the TV studio on the 19/1/11 and it was fascinating, we had a chance to work the cameras and make a short broadcast (with an enormous amount of help!). Great resource with really inspiring staff.