
-
Blackboard Achievements
Available now!
Extrinsic motivators can be a powerful tool for encouraging students to progress in your courses. You can use Achievements to keep students motivated and congratulate them for how they’ve participated in your course.
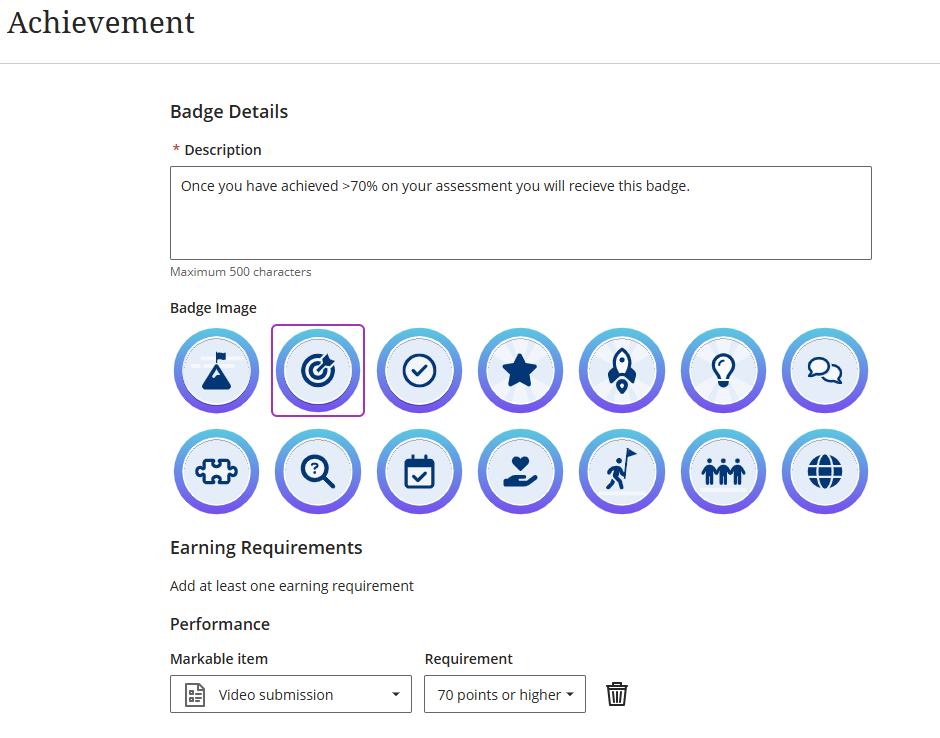
You should now notice a new addition to the top tab in your Blackboard module areas called Achievements. This is where you start in creating a badge for students to achieve based on specific criteria.
Achievements is a very simple tool that you can use in your module or programme areas in different ways:
- Support self-directed learning pathways. You can give learners tasks, goals, or ‘quests’with clearly defined criteria. Learners can have more flexibility in how they approach their activities. They might choose to focus on a particular area of development before moving on to another. This can replace a set sequence, personalising the learning.
- Engage and motivate learners. Some learners respond to extrinsic motivations. They feel satisfied when they complete tasks.
- Adds transparency of learning. Course badges that define the skills and competencies in a course can help students to see how they’re developing competencies and also can better understand and demonstrate to others what they’re learning.
Why not consider how you could incorporate Achievements into your teaching?
More information can be found on the Blackboard Help pages and also in our Blackboard and Supported Tools Course.
-
Introducing Blackboard’s AI Conversation and AI Design Assistant

This week we are releasing two new sets of tools to Blackboard; ‘AI Conversation’ and ‘AI Design Assistant’.
We’ll be presenting the tools at the SOLSTICE and CLT Conference, on the 18th June 2025.
To help you become familiar with these tools I’ve recorded the following videos, and included some additional resources.
Introduction
AI Conversation
Socratic Questioning
- Part 1 – Introduction [1:40]
- Part 2 – Setting up [2:56]
- Part 3 – The Student Experience [1:29]
- Part 4 – Giving Feedback to Students [1:08]
- Part 5 – Ideas for Use [1:26]
- New Feature: Auto-Generate Conversation [2:34]
Role Play
- Part 1 – Introduction [0:47]
- Part 2 – Setting Up [2:05]
- Part 3 – Student Experience [0:51]
- Part 4 – Viewing the Student Answers [1:20]
- Part 5 – Ideas for Use [1:26]
- New Feature: Auto-Generate Conversation [2:34]
Additional Resources
- Blackboard AI Conversation Help Page.
- Auto-generate AI Conversations.
- Blackboard User Group 6th February. Led by Ellis Reeves & Meredith Hawcroft, University of South Carolina Aiken, USA.
- Blackboard User Group 12th June. Led by Katy Sheader & Paul Finley, Durham University.
- Online role-play environments for higher education, Russell and Shepherd, 2010.
- Using AI Based Chatbot ChatGPT for Practicing Counseling Skills Through Role-Play, Maurya, 2023.
AI Design Assistant
Generate Test Questions
- Part 1 – Setting up [4:08]
- Part 2 – Ideas for use [0:54]
Generate Learning Modules
- Setting up [2:34]
Generate Journal Activities
- Setting up [2:20]
Generate Discussion Activities
- Setting up [2:24]
Generate Assignments
- Setting up [2:25]
Additional Resources
- AI Design Assistant Help Page.
- Writing Multiple-Choice Questions for Higher-level Thinking, by Mike Dickinson.
- Learning and Assessing with Multiple-Choice Questions in College Classrooms, by Jay Parkes, Dawn Zimmaro. 2016.
Image by Yutong Liu & Kingston School of Art / Talking to AI 2.0 / Licenced by CC-BY 4.0
-
New and Updated VLE Baseline – Launching September 2025
We’re excited to announce the launch of the new VLE Baseline for September 2025, which replaces all previous versions. This updated Baseline outlines the expected standards for all undergraduate modules delivered via Blackboard.
Informed by the Blackboard Exemplary Course Programme (ECP) rubric and developed in consultation with colleagues from across the University and in collaboration with our University Fellows, the Baseline is fully supported by the Learning and Teaching Committee and the Associate Deans.
(more…)